Customizing your tags
When you first start using GuestView, the following tags are created for you:

You can see this list of tags by clicking the “Tags” menu item on the left-hand side of your GuestView screen. These tags appear as checkboxes for each of your guests. In this topic we’ll explore how to customize tags for your church’s use.
Renaming a tag
Let’s say for example that your church calls its small groups home groups, so you’d like to rename the “Small group” tag to “Home group.” Click on the “Small group” tag to go to its page:

On this page, click on the “Rename tag” link highlighted above. A box will appear that allows you to change the name of your tag. Notice how the tag’s group and its name are strung together, as “Interests:Small group.” To keep your tag in the Interests group, you’ll want to type “Interests:Home group” and click “Rename tag.”

Deleting a tag
Now let’s assume that you don’t have a “New members class” checkbox on your guest response cards, so you want to delete this tag. Go back to the list of all tags and click on the “New members class” tag:

On this page, click on the “Delete tag” link highlighted above. Two buttons will appear that allow you to confirm or cancel deleting the tag. If you click “Yes,” this tag will be deleted:

Adding a new tag
Now imagine that your church has multiple services on Sunday and you want to create a set of tags to track which service each guest attended. Since these tags are related, you’ll want to put them in the same group. We can call the group “Service” and the tags “First service” and “Second service.” Because GuestView strings the group name and the tag name together, you’ll actually be typing “Service:First service” and “Service:Second service” when you add these tags.
First, go back to the list of all tags for your church, and click “Add new tag” at the top of that page. In the box that appears, type “Service:First service,” and then click “Add tag”:

If you repeat this process for the tag “Service:Second service,” you’ll see the tags appear in your list of tags:

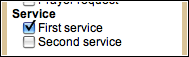
And you’ll see checkboxes for these tags when editing a guest’s information:
Other ways to use tags
We’ve discussed how to add tags to help you keep track of guests for multiple services. Here are some other ways you might consider using tags:
-
Your tags can keep track of multiple campuses:
- Campus:Downtown
- Campus:West shore
-
Your tags can mark which Sunday school class or small group a guest visited:
- Sunday School:Young married
- Sunday School:BSF
- Sunday School:Systematic theology
If your small groups or Sunday school classes perform their own follow-up, you will want to group the GuestView callers for each small group or class together. We’ll discuss how to do this on the next page.
-
You can use tags to keep track of where you are in multiple stages of follow-up, for example if you have several callers contact each guest over the course of several weeks:
- Stage:Week One
- Stage:Week Two
- Stage:Week Three
- Stage:No further interest
Now let’s see how you can invite your follow-up team to get started using GuestView ›